The Smart Mink Trap & Raft
Standard Design & Assembly for WRT Smart Rafts
Raft (Filcris.co.uk)
Filcris edged mink raft with 215mm high tunnel walls and no hole for a clay pad – marketed as ‘Fenland Edged’.
Cost – £186.59 incl VAT (discount available on bulk orders, and price is subject to change).
Notes: This raft does not shed polystyrene balls and should have an almost unlimited working life. Doing away with the hole in the floor eliminates any risk that mink may not like to walk on wire mesh and increases the retention of scent from previous mink.
Cage trap (perdixwildlifesupplies.com)
Perdix mink trap with reduced entrance. Comes with green powder coating as standard.
Cost – £56.40 incl VAT (discount available on bulk orders, and price is subject to change).
Notes. Perdix cage traps are sturdy and well made; more so than other, less expensive makes. They are fitted with wire mesh doors, which allow the quick and easy attachment of the cable from the alarm unit magnet. As with other cage traps, each unit must be checked and adjusted before being deployed. See instructions below.
Trap monitoring unit (remotisystems.com)
Remoti.
Cost £118.80 incl VAT for unit and one year of operation. The cost thereafter is about £27+VAT per year. Additionally, there is a small charge for each text message (<5p).
Notes. The only viable alternative to Remoti at present is Mink Police, although Perdix has long been intending to market a more sophisticated (and expensive) trap alarm. Mink Police are currently being marketed commercially in the UK at £199 incl VAT (e.g. Fourteenacre Ltd).
Remotis are very reliable, and the manufacturer (Ben Morley) will readily replace any that fail. Their main disadvantage compared to Mink Police is that they have no antenna cable extension option, but in most cases, these would not be helpful, anyway.
Monitoring unit setup
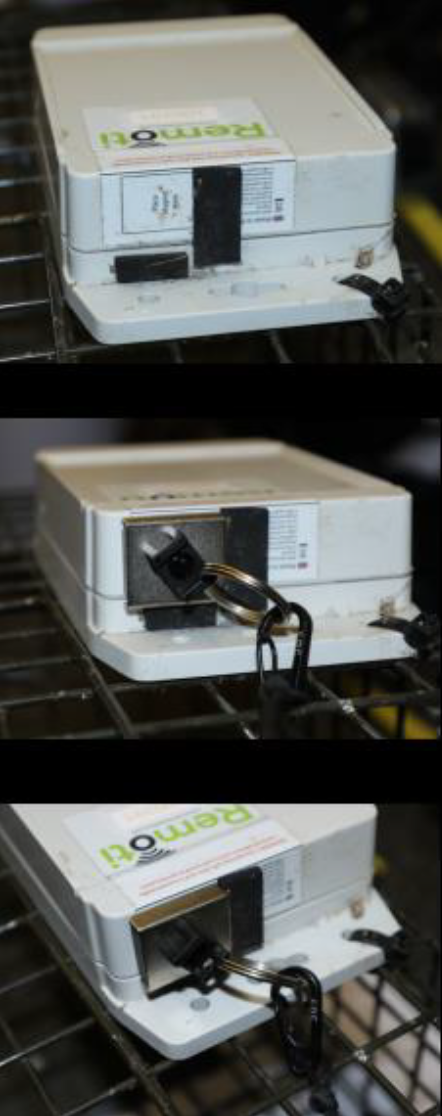
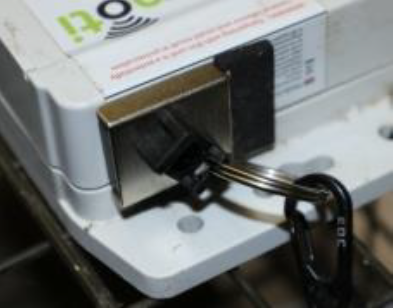
Remoti mounted on top of the cage trap with cable ties. Sticky-backed foam strips support the magnet in place on the Remoti housing and allow the magnet to be reset in the correct position every time. The magnet cannot slip downwards and set off the alarm when the raft is agitated by wind or boat wash. Having the Remoti on top of the trap, under the tunnel roof, prevents animal interference with the magnet or the cable attached to it. Another significant advantage of this configuration is that the cable twixt magnet and trap door is short and does not need to negotiate any bends when being pulled by the door. If anything, on average the signal strength of the Remoti is higher when the unit is placed horizontally.
The magnet is the standard one supplied by Remoti, to which a key-ring style spiral clip is attached. It is connected to the trap door by a short piece of braided nylon cable (2mm black cable costs £6.45 for 50m on eBay). The cable is secured in place at each end by a mini carabiner clip (16p each on eBay, in packs of 10). The carabiners allow a cable to be replaced in 20 seconds and can be re-used many times.
The cable that connects the trap door to the magnet may be chewed by a captured animal, whether it’s a mink, rat or water vole. Given that failure of the cable could be disastrous (in that the trap door could close but the alarm not be triggered) we have opted for a cable that is cheap and easy to replace if damage is even suspected. In reality, the cable requires replacement only in 10-20% of trap alarms. Tying a chewed cable back together is inadvisable because the knot may get caught on the trap mesh.
Identifying plaque
For any raft on a river or other public place, it’s helpful to place on it a plaque or label that will allow it to be returned if it gets washed away, and for people to see that the equipment is owned by an identifiable person or group. The plaques are made of stainless steel and are screwed to the roof of the tunnel (using stainless steel screws).


Assembly Instructions
Remoti Unit
Items required:
- Remoti unit (and associated accessories).
- Activating magnet.
- Batteries (4 x Duracell Procell alkaline).
- Duct tape.
- Sticky-backed neoprene foam.
- 25mm diameter key ring.
- Phillips (cross-head) screwdriver.
1. Screw the 4 captive screws all the way into their holes in the back of the unit. You can use a powered screwdriver for speed. Do not join the two halves of the box at this stage.
2. Check that the O-ring groove in this back plate is clean and undamaged. Gently place the O-ring into it, flat side down. Use a blunt pencil or similar, to encourage the O-ring into the groove, ensuring that it’s not twisted or stretched. It should fit perfectly.
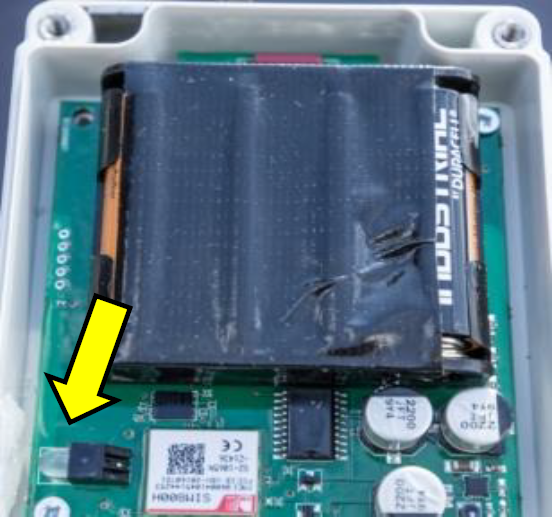
3. Place the four batteries into the holder in the upper part of the box. Ensure they are the right way round and pushed firmly into place. Place a piece of duct tape over the batteries, oriented in the same direction as the batteries, not across them. Allow about 10mm of tape to overlap at each end, and firmly push that down on the flat ends of the battery holder. This will prevent the batteries shaking loose.
As soon as the batteries are in place, the LED light (tip of arrow opposite) should start flashing red. This is normal.
4. Carefully unite the two halves of the box. Placing the unit on a flat surface with the screw heads facing up, use a cross-headed hand screwdriver to very carefully engage each screw into its respective hole in the other half of the box. Turn the screw anti-clockwise for half a turn before then proceeding normally. This should reduce any chance of cross-threading. There should be very little resistance. If any is encountered, stop immediately and go into reverse before trying again. In a small minority of cases, these screws can cross-thread. If this happens, the unit is sometimes unusable.
Once each screw in engaged and turning freely, continue turning it until resistance is felt and you can see the two halves of the box being pulled together in that corner. Stop and move on to the next screw. When all 4 are at this stage, drive each by one revolution, move to the next and keep repeating until all have gone as far as they can. Do not over-tighten, otherwise you can break the plastic.
5. Cut two pieces from the neoprene strip, one about 20mm long and one 15mm. Split the longer piece down the middle and keep one half for the next Remoti. Now place the rectangular magnet onto the box in the marked place. You will find that the ‘sharp’ edge of the magnet housing naturally fits into the groove between the two halves of the box. This is good. Now gently slide the magnet towards the rounded edge of the box, keeping the magnet housing in the groove, and stop just before the magnet reaches the curved corner. This is where we want it to sit. Now peel the backing off the shorter piece of neoprene strip and carefully place it up against the bottom of the magnet, keeping it off the join between the two parts of the box. Press it firmly down. Next, remove the backing from the long, slim piece of neoprene and carefully place it along the long side of the magnet, avoiding the groove. Press it down. You now have a niche into which the magnet can quickly be placed, even in poor light.
6. Attach the key ring to the plastic buckle on the back of the magnet, using the side that doesn’t have the cable through it.
Cage trap
Items required:
- Cage trap.
- Wooden dowel and hammer to hand in case of need.
- Adjustable water pump pliers to hand in case of need.
1. The trap comes ready assembled, but may need adjustment to allow it to work properly.
2. Firstly, check that the door will open and close smoothly. Use your fingers to lift the bar that holds the door closed, then swing the door inwards and move it up and down several times to see if it catches on the bar either side. If it does, allow the door to close, then place the end of a wooden dowel on to the base of the bar structure and gently tap the other end of it with a hammer. The idea is to nudge the structure across the trap by just a few mm so it no longer impedes the door. Check whether your nudging has done the trick and, if not, repeat the process until the door moves up and down freely.
3. Secondly, check that the treadle lays flat, or almost flat, on the floor of the cage. If it doesn’t, you may find that the activation bar that holds the door open will not pull backwards far enough to allow the door to close. In these circumstances, get a pair of adjustable water pump pliers or similar, gently grip each hinge of the treadle in turn, and bend the treadle down by a few mm on each side, using a finger. This will then cause the treadle to lie flat.
Connecting cable
Items required:
- 420mm of suitable cord (2mm diameter black braided nylon works well).
- 2 small carabiner clips.
1. Place one end of the cable through the hole in the bottom of a clip, pull it through by about 65mm and grip that end against the cable with finger and thumb. With your other hand, tie an overhand knot in the doubled part of the cable, as though the carabiner clip was not present. The knot will appear below the clip and is totally secure – the clip cannot slip off.
2. Repeat the process with the other end of the cable.
Placing the Remoti on the trap
Items required:
- Cage trap.
- Remoti & magnet.
- 3 cable ties of 3-4 mm width (the shorter the better).
- Clippers.
- Connecting cable.
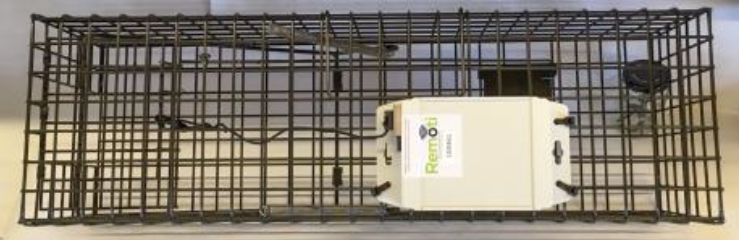
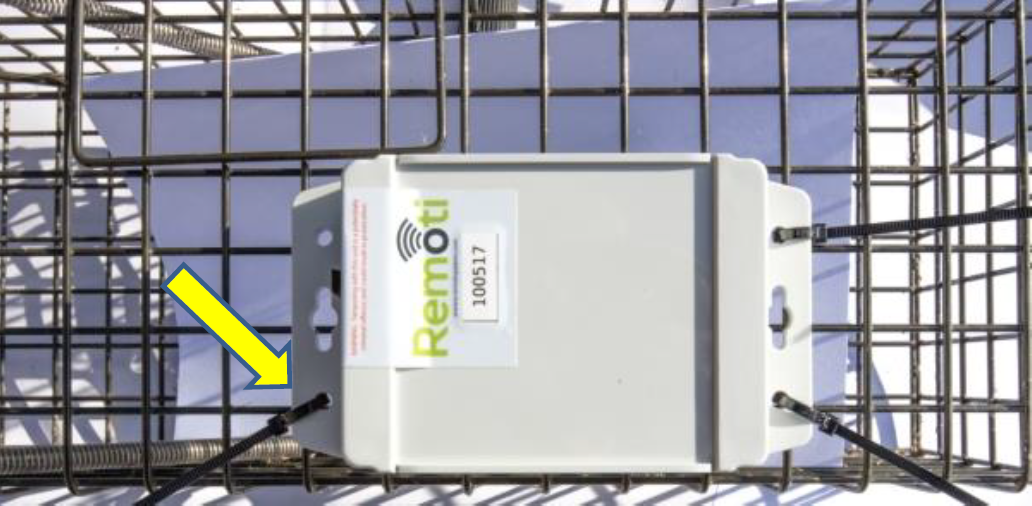
1. With the open end of the trap to your left, place the Remoti on top of it in the position shown below, ensuring that the magnet position is towards the front of the trap. The front of the Remoti is just less than 3 meshes back from the front of the trap handle.
2. Insert each cable tie in turn through a hole in the Remoti, bring the end round the back of a mesh, insert it back into the clasp and pull through, but don’t tighten any yet. Once all three cable ties are in place, progressively tighten them in turn. Pull them hand tight only. Wiggle the unit by hand to ensure it doesn’t move very much, then cut off the surplus cable tie with the clippers. Note that the cable ties on the side away from the magnet go down through one hole in the wire mesh and come up through the diagonally adjacent hole – this prevents the Remoti from moving. Note also that no cable tie is needed on the corner of the Remoti near the magnet.
3. Open the trap door and hold it up with the connecting bar. You will need to locate the bar through the hanging cradle first, and sometimes this is a fiddle, especially if the bar is trapped on the floor. Be patient as you wiggle it free; do not bend the bar.
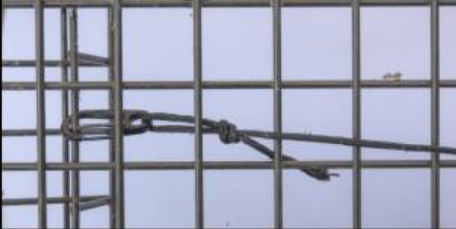
4. Pick up the connecting cable; clip one end onto the key ring on the magnet. Drop the other clip through the trap roof 2 meshes back from where the door reaches when it’s held open, and in line with where the magnet will sit on the Remoti unit. Now pull the clip towards the trap front and attach it to the door.

5. Take the end of the black cable that came with the magnet and tie it on to a convenient place on the trap roof, roughly midway between Remoti and door. This acts as an anchor to prevent the magnet being lost in the event that a captive animal chews through the other cable.
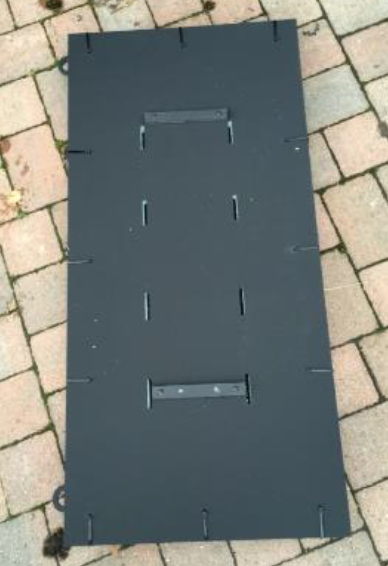
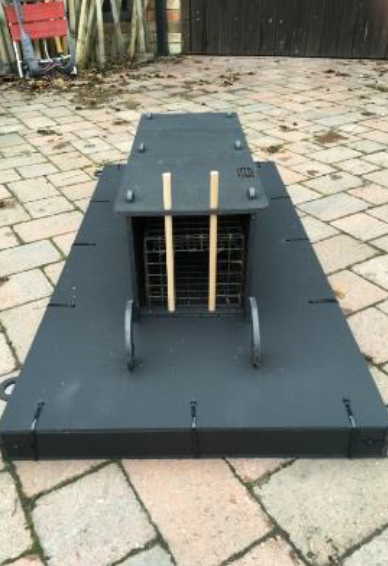
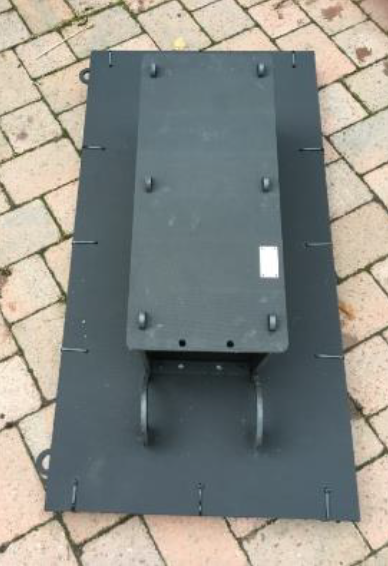
The Raft
Items required:
- Raft base.
- 2 tunnel sides.
- Tunnel roof.
- Shuffle step (black plastic rectangle with two pre-drilled holes; supplied by manufacturer).
- 2 plastic pegs (or more if you don’t hit them straight!).
- 2 end stops (black plastic curly things; soon to be replaced by a simple wedge).
- 2 dowels.
- stainless steel identification plaque.
- 4 stainless steel screws.
- Small screwdriver.
- Hammer.
- 5.5mm diameter drill bit.
- Electric drill.
- Small piece of wood or plywood.
- Emory paper strip 15cm long.
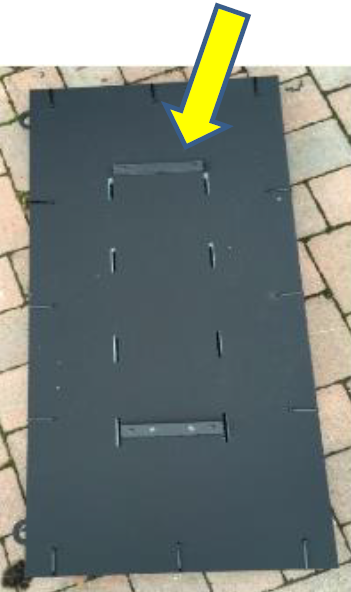
1. Lay out the raft base on a flat floor, with room to work around it. You will see that there are two parallel rows of machined slots. At one end of the slots, already in place, will be a plastic rectangular shuffle step with two large holes drilled into it, to take the dowels (bottom of photo). This is the front end of the raft. If there is a second step already in place (yellow arrow), go directly to step 3 below.
2. Place the loose shuffle step on the raft in the position shown (yellow arrow), at the opposite end of the row of slots to the dowel holes. It needs to be central and with its front edge just behind the back of the rearmost slots. Holding this piece of plastic firmly in place, put the tip of the 5.5mm drill bit into one of its holes and drill vertically down until suddenly you go into the polystyrene underneath. Withdraw the drill still holding the step in exactly the same place. Use your free hand to find a plastic lug and put the tip of it into the same hole on the step. Now pick up the hammer and strike the lug firmly and vertically repeatedly until the cap is flush with the step. You MUST hold the step in place throughout, otherwise you are doomed. Similarly, you MUST hit the lug vertically, otherwise it will bend and you will be doomed. With one end of the step now secure, hold the other end in the right place and repeat the drilling etc. This process is simple if done correctly, and a nightmare if not. Don’t be afraid to hand the job to a more experienced driller/hammerer if need be. Much better that than have a pile of damaged and incomplete rafts.
3. Insert the lugs on the bottom of a tunnel wall into the raft slots ensuring that the end with the little sharp protrusion (shown by the yellow arrow below) is pointing towards the pre-installed step or the pre-drilled holes. This is the front of the tunnel. Repeat on other side.

4. Hold the piece of wood flat against the front edge of one wall and firmly tap it with the hammer to push the wall backwards until it can go no further. The wood prevents you damaging the plastic with the hammer. If the wall doesn’t move at first, it’s probably because the lugs are not fully slotted in. Repeat on other side.
5. Take an end stop and insert the pointy end into the slot in front of one wall, with the notch facing up (and the curl going down). You are aiming to force this wedge shape of plastic into the slot until the pointy protrusion on the front of the tunnel wall slips over the notch. This will likely require some wrestling, especially in cold weather. Once the wedge has been introduced into the slot and pushed in by hand as far as possible, use the hammer to firmly tap the top of the swirl until suddenly the notch slips under the pointy protrusion. Then stop. Repeat on other side.
6. Place the tunnel roof on top of the walls ensuring that the pre-drilled holes are towards the front of the raft. Both sides of the roof are the same, but front and back are different. Locate the wall lugs into the slots on the roof. Take the hammer and force the roof down onto the lugs, one by one. This takes some serious force and straight hitting. DO NOT hit the lugs. You will need to hit the roof as close as possible to the lugs, and with strength. Tapping it will fail miserably. If you can’t do this easily, give this job to someone who can. The risk is that you may damage the lugs and perhaps even have to throw away the damaged walls.
7. Tear off a 15cm section of the emory paper strip, then split it in half longitudinally by tearing. Place a piece through one of the tethering loops, grab the loose end and start smoothing off the sharp edges on the inside of the hole by dragging the paper against them in a sawing motion. 30 secs should be enough.
8. Put a dowel in each of the circular holes on the tunnel roof and engage each in the corresponding hole in the floor.
9. Job done.
Testing the Remoti unit
Remotis are normally extremely reliable, but it is very important to test each one before you put it into the field. To do this properly, you will need the unit to be activated on the Remoti system, and that requires your action, because they are not activated when you get them through the post. Activate the unit via the Admin section of the Remoti portal. Do this at least 3 hours before installing the batteries, as described above, and preferably the day before.
Having activated your Remoti unit, assembled and mounted it on a trap, you are ready to test it. Take the trap to a place a little away from buildings if you can, and put it on the ground or a table. If the magnet is on the Remoti already, pull it off and wait three minutes. Check that the cable to the trap door has been attached at both ends, and that the door is correctly held up by the activation bar. Then put the magnet on the Remoti unit in the assigned place, and start watching the small circular window on the top of the box. After 10-15 seconds you should see a red LED light flashing very rapidly for a few seconds, then slowly. This is the unit waking up and starting to search for a phone mast within range. If it finds such a mast, often after 10-20 seconds, the flashing will go a little bit faster. After a further 10-20 seconds, the flashing red goes faster still, followed by a steady green light for 5 seconds, then off completely. Only after the green light has appeared and disappeared do you know that the Remoti system has acknowledged that the trap is set.
Once the green light has gone, wait 5 seconds and push the treadle down with a finger through the mesh, until the trap door closes with a bang. This will whip the magnet off the Remoti, and the same sequence of flashing red lights, followed by 5 seconds of green, should start. Repeat this whole testing sequence, then go to the Remoti portal and check that the Remoti system has correctly logged each set/unset process. If it has, the trap is fit to deploy.
Assigning the Remoti unit to a Location
The Remoti system works as follows:
The network Administrator (perhaps the WRE county Project Officer, say) enters the name of a ‘Location’ and then assigns particular Remoti unit numbers to that Location. Confusingly, a Location in this context means an area within which one or more Remoti units are placed. When each Remoti is assigned to the Location, the Administrator must provide a name for the actual site of that unit (confusingly called Location description on the Remoti website), so when an alarm is sent for that Remoti, the message will identify Location and Site – for example, Littleport: Brown’s Bridge.
The Administrator must then tell the Remoti system which Users are to be notified when an alarm goes off on any unit assigned to a Location. It is not possible to have a particular User alerted by alarms on some units at a Location, but not others.
It is crucial to understand that people will only be alerted to a trap door closing if every link in the alarm chain is in place. These are the links –
- The trap door must be securely attached to the Remoti magnet.
- The Remoti unit must have been properly set (culminating in the green light).
- The unit must have been assigned to a Location by the Administrator.
- One or more Users must have been allocated to that Location.
- In the case of text messages, those Users must have been authorised to receive them on the Remoti website.
- The Users must be alert to the possibility of an alarm being sent (i.e. they must be able to receive a text message and/or an email).
Mink Raft Deployment
How many, how far apart?
There are no definitive answers to these linked questions. In principle, the more smart rafts on a given water body, the faster the mink population will decline, but the law of diminishing returns applies. Doubling the number of rafts/traps is unlikely to double the catch of mink. GWCT guidelines suggest a spacing of 1 raft per km of waterway bank, but this is impractical over landscape-scale trapping operations. When traps are in short supply, it is better to place them unevenly – more where mink are abundant, and fewer where mink are rare. One per km may be needed in areas of rich wetland while one per 5-10km may be sufficient in small watercourses or depleted habitats.
What makes a good mink spot?
- It’s hard to predict where mink occur, but habitat quality will normally be a good guide. Winding rivers with overhanging trees and complex banks are generally more attractive than straight, steep-sided drainage ditches, but sometimes mink turn up in seemingly unfavourable places. Select waterway junctions if any are visible. Local knowledge will normally help to identify where mink are more likely to live.
- Aim for somewhere safe and convenient to access in different conditions – flood, snow, drought etc. Avoid steep waterway banks.
- If all else is equal, select locations without public access, but sometimes this is unavoidable.
- If possible, avoid locations near sluices and outfalls.
How to deploy the raft
- Choose a good trapping site, bearing in mind likely water level and flow rate fluctuations (long term river gauge data are available at https://flood-warning-information.service.gov.uk/river-and-sea-levels or https://riverlevels.uk/. Where big fluctuations are possible, longer tethers, looped to a tall post, may be needed to allow the raft to rise and fall. Alternatively, tie a long rope to a high, strong branch. In such waterways, find an area where there will be some slack water for the raft to drift into.
- Determine what the raft will be tethered to. In all but exceptional circumstances, the raft should be tethered at each end, to two independent points on the bank. If existing reliable structures are available, such as a fence post or tree, use those. If not, stakes will be required. Bear in mind that, in a river, flow rate will increase significantly during flood episodes so make sure that any fixing is able to take the strain. Stakes should be 50mm diameter, 1.5m long and driven well into firm ground.
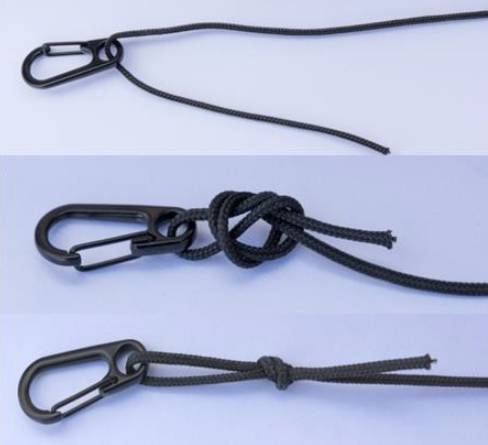
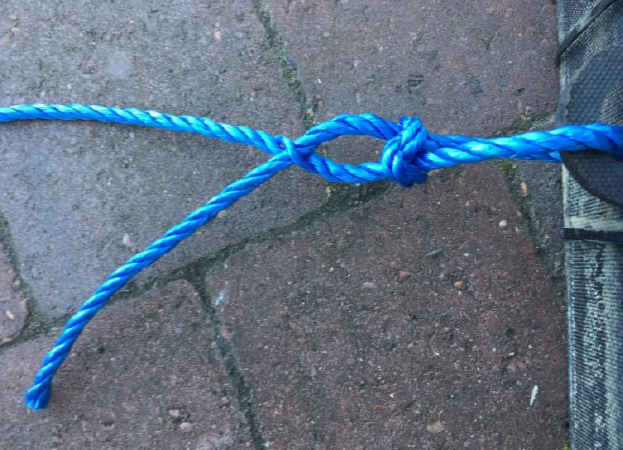
- Use polypropylene rope or similar, of at least 6mm diameter, for the tethers. Thinner material, and bailer twine especially, will wear and break. Once the location has been selected, estimate the length of rope required to reach the stakes or other bankside tethering places, remembering that extra may be required to accommodate water level fluctuations. Cut each piece of rope to the desired length and securely attach one end to the raft. A bowline or two half-hitches will suffice, but for safety thread the end of the rope back through the strands, as shown in the illustration below. A similar knot should be used if attaching the raft to a tree or an existing fence post. If you use a new stake, tie a loop on the end of the rope, place it over the stake and push the loop down to the ground. Drive a 6″ nail through the post near the top to stop the loop slipping off if flooding is possible at that site.
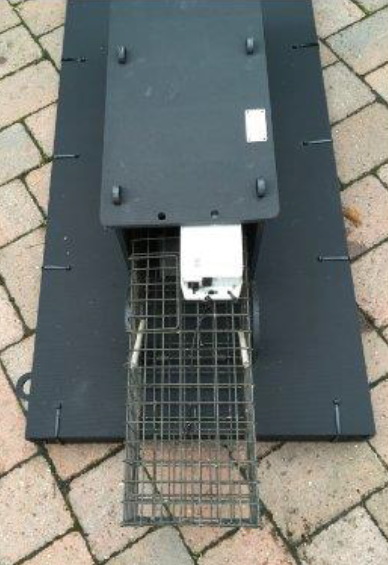
- Once the raft is attached, launch it and check that both tethers are of the right length. Remove any reeds or overhanging twigs/branches that might interfere with the trap. Pull the raft back to the bank, then slide the prepared smart trap into the tunnel, with the trap entrance at the end with the dowel otter excluders. Gently push the raft back out, using a stick if easier.
Raft Inspection regime
To make sure that traps are functioning correctly, each should be checked on every visit, after flooding events, and at 3-month intervals if no activations are reported. Check that the tethers are not damaged, that the stakes and knots are secure, and that no debris has entered the trap. Ensure that the cable between the Remoti magnet and the trap door is undamaged. Each inspection should be logged as a visit in the WRE database.
Your safety
Every trap visit has the potential for you to fall in the water. Do a mental risk assessment on every approach. Move slowly and cautiously, especially on steep banks and where there’s a muddy margin to the waterway. Follow all Health and Safety advice from your employer and on the WRE Website (https://www.waterliferecoverytrust.org.uk/safety-first/).